Examples 11-20
Example 11: Resample Image
This example is provided to show how to resample a part of an image. Such resampling is especially interesting and useful when one combines resampling with the powerful reference systems.
import arr,geom
#---------------------------------------------------------------------
# Resample
# resamples 20x20 mm of originalImage
# - the origin is defined by the reference identified by referenceName
# the resulting image is of size 60 x 60 pixels and set to image imageName
#---------------------------------------------------------------------
def Resample(originalImage,referenceName,imageName):

  sub_x = 20.0 # section of original image in millimeters -
  sub_y = 20.0 # dimensions given by the reference system
  res_x = 60 # size of resampled image
  res_y = 60 # in pixels
  # get pointer to Reference tool
  t = GetTool(referenceName)
  ref = geom.m33f()
  ref.data = t.childRefSys
  if ( t.result['Status'] == 1 ):  # reference system is valid
     orgim = GetImageMatr(originalImage) # get image data
     # prepare resampling
     p = arr.gridPoints(res_x,res_y,1) # create regular grid matrix of size res_x by res_y, from (0,0)
     p = arr.toFix(p*geom.scal(sub_x/res_x,sub_y/res_y)*~ref)
     # overlay grid points on original image, using toFix for efficiency
     # resample image
     subim = arr.bilInterpolate(orgim,p) # extracts samples from orgim at positions given by p
     # set the resampled image to imageName
     SetImageMatr(imageName,arr.toUint8(subim))
In the Scrabble example a letter is placed under the camera. The size and orientation of this letter may vary.

By establishing a reference system that finds the letter and by resampling one can produce a clean letter image

This image has the same size and orientation no matter how the camera or letter is positioned.
Example 12: Constant Image Contrast
This example is provided to show how to adjust the contrast of an image
import arr
def AdjustContrast(imageName,low,high):
  contrast = high - low
  # based on constrast a gain factor is given
  # the low intensity value of the adjusted image is 40
  # the high intensity value is 40 + 170 = 210
  lgain = 170.0/contrast
  lOffset = 40 - low * lgain
  # adjust the contrast of Image
  im1 = arr.toFloat(GetImageMatr(imageName))
  im1 *= lgain
  im1 += lOffset
  SetImageMatr(imageName,im1.rangeToUint8(0,255))
Example 13-A: Serial Communication using PythonWin
This example outline how to interface any external rs-232 device from python using the pyserial module. PySerial is included in the Scorpion Vision Installer Extensions I
from serial import *
c=Serial(0)
c.write('com port support from Python')
if c.inWaiting():
  print c.read( c.inWaiting() ),'characters read'
else:
  print 'no reply'
  c.close()

#The code opened COM1 @ default setting 9600,8,N,0
from serial import *
c=Serial(0,19200,8,'E',1)
# com port opened at 19200 baud, 8 databits, even parity, 1 stopbit
c.close()
Type help(Serial) in PytonWin or IDLE and you will get help on the syntax.
Hint: ASCII data and Python
A few words on ASCII data and Python.
- use ‘x03’ for generating control characters or the chr() function.
Make up your string to be
str='\x0a'+'\x0b'+chr(13)
Example 13-B: Serial Communication in Scorpion
The serial script are often added to the Central section of Scorpion
Central.Start: # initialise
from serial import *
com=Serial(0)
Central.Stop: # terminate
com.close()
In Python or user defined script
mystr = 'something'
com.write( mystr )
Example 14: Python Results
A number of tools returns results as python string. These results contains array of scalars or points.
A typical result string looks like this:
'''
((190.41,208.87),(190.61,225.7),(190.9,242.52),(191.18,259.35),(191.34,276.18))
'''
pointStr = GetValue('Edges.Edge points')

print ' python string : ', pointStr
points = eval(pointStr)

print ' points as list ', points

print ' length of list : ', len(points[0])

print ' first element : ',points[0][0]
print ' x : ',points[0][0][0]
print ' y : ',points[0][0][1]
Output in the console windows:
 '''
 python string : (((190.41,208.87),(190.61,225.7),(190.9,242.52),(191.18,259.35),(191.34,276.18),(191.5,293.28),(191.85,310.3),
 (191.98,327.08),(192.08,343.8),(192.35,360.52),(192.59,377.24),(192.76,393.89),(192.86,410.55),(193.03,427.3),(193.34,444.04),(19
 3.61,460.77),(193.75,477.44),(193.95,494.18),(194.2,510.92),(194.42,527.67),(194.59,544.41),),)

 points as list (((190.41, 208.87), (190.61000000000001, 225.69999999999999), (190.90000000000001, 242.52000000000001),
(191.18000000000001, 259.35000000000002), (191.34, 276.18000000000001), (191.5, 293.27999999999997), (191.84999999999999, 310.30000000000001), 4
(191.97999999999999, 327.07999999999998), (192.08000000000001, 343.80000000000001), (192.34999999999999, 360.51999999999998),
(192.59, 377.24000000000001), (192.75999999999999, 393.88999999999999), (192.86000000000001, 410.55000000000001),
(193.03, 427.30000000000001), (193.34, 444.04000000000002), (193.61000000000001, 460.76999999999998), (193.75, 477.44),
(193.94999999999999, 494.18000000000001), (194.19999999999999, 510.92000000000002), (194.41999999999999, 527.66999999999996),
(194.59,544.40999999999997)),)

 length of list : 21

 first element : (190.41, 208.87)

 x : 190.41
 y : 208.87
 '''
Example 15: Making a result string
The string “Position = (1043.6m-276.6) [mm] Angle = 132.4 [degrees]” is generated by the following Script contained in a PythonScript tool in the toolbox.
The ExternalText tool PositionStr is connected statepanel as the parameter.
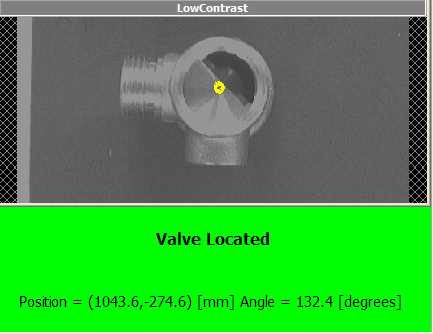
#The tool PickPoint contains the position of the valve
x = GetValue('PickPoint.Point_x')
y = GetValue('PickPoint.Point_y')
# The tool PickReference contains the calculated angle of the valve
a = GetValue('PickReference.Angle')
str0 = '= (%(x).1f,%(y).1f) [mm] Angle = %(a).1f [degrees]' %vars()
SetValue('PositionStr.Text',str0)
Example 16: Automation by tool scripting
A very powerful feature in Scorpion is to run the tools from a script.
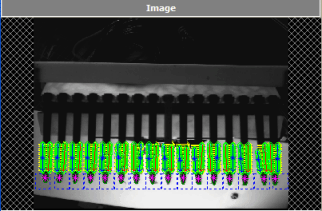
img=GetImageMatr('Image') #get the image
ref=GetTool('Reference') #get the reference

org=ref.result #store the origin
blob=GetTool('Blob')
line=GetTool('Line')
res=GetTool('Count')
distance = GetTool('Distance')

no = 0
y0 = -50
dSum = 0
for i in range(16):
  blob.execute(img) #execute blob at first candle

  y = ref.getValue('Value_y')
  cnt=blob.result['Count'] #get result cnt
  if (cnt >= 1) :
    no = no +1
    line.execute(img)
    distance.execute(img)
    d = distance.getValue('Distance')
    dSum = dSum +d
  cx=blob.result['CenterOfGravity_x'] #get result x
  y1=blob.result['CenterOfGravity_y'] #get result y
  #print 'y1 : ',y1
  res.setValue('Value',no) #update blobs found

  ref.setValue('Value_y',y+50+y1) #offset to next candle
  #offset to next candle
  ref.execute(img) #recalculates reference
  print i,y,cx,y1
  y0 = y1

ref.result=org #restore origin result
meanDistance = GetTool('MeanDistance')
meanDistance.setValue('Value',dSum/no)
Example 17: Image Manipulation with Python
Copy a subimage to another image
import arr,geom

im1 = GetImageMatr('Image 1')
im2 = GetImageMatr('Image 2')
box = geom.Box2i((100,100),(400,400)) # 300x300
sub = im1.subMatr(box) # extract submatrix
im2.copyToSubMatr(150,250,sub) # paint submatrix in im2

SetImageMatr('Image 2',im2)
Create a white image - 8 bit black and white
import arr
im=arr.uint8Mat(r,c) # r=rows,c=cols
arr.setArr(im,255) # or any other pixel value
Create an empty 24bit - RGB image
import arr
rows = 1024
cols = 1280
imrgb = arr.Mat('RGB',rows,cols) # pixel values are all 0
Concatenating same size images
import arr
im = arr.concat((im0,im1,im2),(im3,im4,im5),(im6,im7,im8))

# Result is:
#
# +-----+-----+-----+
# | im0 | im1 | im2 |
# +-----+-----+-----+
# | im3 | im4 | im5 |
# +-----+-----+-----+
# | im6 | im7 | im8 |
# +-----+-----+-----+
#
Resample an annulus (“doughnut”) to a square image
import math,arr,geom
im = GetImageMatr('Image')
cx,cy = 408,424 # center in image
r1,r2 = 1,50    # annulus inner and outer radius
#
# Resample a 100x300 image from inner to outer radius
# around the full circle (-pi to pi radians).
# The circle is centered at (cx,cy) in image
#
ann = arr.annulusSectorPoints(100,300,r1,r2,-math.pi,math.pi)
ann *= geom.xlatf(cx,cy)
im2 = arr.toUint8(arr.bilInterpolate(im,ann))
SetImageMatr('2',im2)
#
# Visualise ROI in original image
#
DrawCircle('',cx,cy,r1)
DrawCircle('',cx,cy,r2)
Example 18: Calculate Median Angle
# reads the line count from a linefinder
lines=GetValue('R_Line.LineCount')

# creates list
i=1
values = []
while i <= lines:

values.append(GetValue('R_Line.Angle['+str(i)+']'))
i += 1
values.sort()
print ' R values - ',values
if i == 0:
  Median = 0
if i == 1:
  Median = values[0]
if i > 1:
  Median = values[len(values)/2]
print 'R Median: ',Median
# set result to script value
SetValue('R_Angle.Value',Median)
Example 19: Iterating objects located by a blob
# retrieve tool objects
ref = GetTool('Reference')
innerRadius = GetTool('FindInnerCircle')
outerRadius = GetTool('FindOuterCircle')
#get image handle
img = GetImageMatr('Image')
#init state values
largeRing = 0
smallRing = 0
for no in range(int(GetValue('ObjectLocator.Count'))):
  # get results from blob
  x = GetValue('ObjectLocator.CenterOfGravity[%.0f]_x' % (no))
  y = GetValue('ObjectLocator.CenterOfGravity[%.0f]_y' % (no))
  # set position to reference
  ref.setValue('Value_x',x)
  ref.setValue('Value_y',y)
  ref.execute(img)

  # execute radialarc finders
  innerRadius.execute(img)
  iRadius = innerRadius.getValue('Radius')
  outerRadius.execute(img)
  oRadius = outerRadius.getValue('Radius')

  #print  results
  print iRadius,oRadius

  #classify results
  if not largeRing:
    largeRing = (iRadius < 4.75) and (oRadius > 7.0)
  if not smallRing:
    smallRing = (iRadius > 4.75 ) and (oRadius < 7.0 )

# set external state
SetValue('LargeRing.Value',largeRing)
SetValue('SmallRing.Value',smallRing)
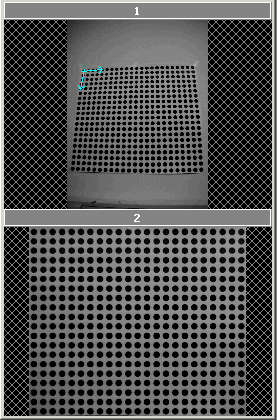
Example 20: Resampling using non-linear calibration
The powerful reference system in Scorpion is also available to Python scripts. This example shows how a non-linear camera correction description (a Calibrator) can be utilized from Python to resample an image, eliminating the non-linear lens distortion. Note that in normal operation with Scorpion this is never necessary. All tools that refer to a Calibrator will have similar corrections done automatically.
The test profile is named CalibResamp and is included with the Scorpion distribution.
- The toolbox contains a Calibrator
- Results from the calibrator are read in a Python script tool, and are used to resample the calibrator image
import arr,geom

#images
name1 = '1'
name2 = '2'

# calibrator object -- we need to get the calib file name from this
calibTool = 'Calibrator'

# dot distance in mm for calibration
dist = 30.0

# Starting UL corner in original image (in millimeters) - just outside blobs
min_x = -dist/2
min_y = -dist/2

# size of resampled image
pix_mm = 1.0 # pixels per millimeter
size_x = 600 # height pixels
size_y = 690 # width pixels

# Get calib object from file, and extract pinCal matrix
calfile = GetValue('System.Profile')+'/'+GetConfigValue(calibTool+'.FileName')
calib = arr.loadArr(calfile)
pinCal = geom.m33f()
pinCal.data = calib.pinCal[0]

# Create grid with requested pixels pr. mm
grid = arr.gridPoints(size_x,size_y,1)
scal = geom.scal(pix_mm,pix_mm)
xlat = geom.xlat(min_x,min_y)
grid *= (scal*xlat)
grid = arr.toFix(arr.objToPix(calib,grid,pinCal))

# Grab image
im1 = GetImageMatr(name1)

# Resample
im2 = arr.toUint8(arr.bilInterpolate(im1,grid))

# Show resampled image
SetImageMatr(name2,im2)